Ceiling Water Damage Restoration Tips

When a ceiling gets water-damaged, it is important to take immediate action. Ceiling Repair Perth can help prevent the damage from spreading to other areas of the home and may even prevent mold growth.

The first step is to identify the source of the leak and then dry out the area. This can be done by laying down tarps and buckets or by using fans and dehumidifiers.

ceiling repair

Identify The Source Of The Leak

The first step in ceiling water damage restoration is to determine the source of the leak. This will help you decide what short-term fixes are needed and what long-term repairs are necessary to prevent the problem from occurring again in the future. Leaks can stem from a variety of sources, including damaged roof tiles, old plumbing connections, and even burst pipes.

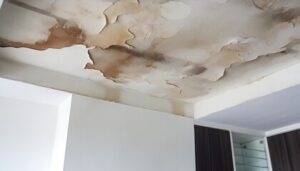
You can start by performing a visual inspection of the ceiling. Look for discoloration and mold growth, which can indicate a slow leak that’s allowed to spread over time. Additionally, if you notice that paint or wallpaper is beginning to peel, this can also be a sign of water damage.

If you do spot signs of water damage, it’s important to take action quickly. Water can cause serious structural damage and if left unchecked, could lead to mold, mildew, or even a collapsed ceiling. This is especially true of ceilings, which are particularly vulnerable to structural damage because they’re above you and subjected to gravity.

As soon as you can, you should try to stop the flow of water from the source. Whether that’s by using buckets, pumps, or wet/dry vacuums, it’s important to keep the water flowing in the opposite direction as it was coming from. This will help reduce the amount of water damage that’s caused, and it can also help lower your chances of mold or mildew growing in the future.

Depending on how much water has accumulated, you may need to use a tarp or bucket to catch it. This will ensure that any valuables or furniture are protected from moisture and kept safe while you work on resolving the problem. The next step is to dry out the affected area. Using fans and dehumidifiers can speed up this process, but you must ensure the entire area is fully dried out, both above and below the affected areas.

Once the impacted area is dry, you’re ready to begin working on the ceiling water damage restoration. This may involve putting in new insulation, replacing sections of the ceiling, or simply applying primer and paint. If the water damage is severe, it may be necessary to replace the entire ceiling and all structural elements above it. This is often a job for professional contractors who have the proper equipment, knowledge, and experience to handle the situation safely and efficiently.

Stop The Leak

When water damage occurs, it’s important to act quickly. If left untreated, the water could spread to other areas of your home and cause significant damage and expensive repairs. Water damage to the ceiling, especially, can cause sagging and structural issues that make it unsafe to live in the room. The best way to prevent this damage is to take steps to identify the source of the leak, stop the flow of water, and dry out the affected area.

The first step in controlling water damage is shutting off the water supply at the valve located under your ceiling or wherever the water is coming from. After that, you’ll want to find the source of the water by looking for damp or sagging spots in the ceiling and walls. Identifying the source of the problem can be tricky since water can come from many different places in your home. If you can’t find the source of the leak, you may need to hire a professional to inspect your roof or plumbing system for problems.

Once you’ve identified the source of the leak and stopped it, it’s time to start drying out the area. If you can, lay down a tarp on the floor below the affected area to protect it from mold and other moisture-related problems. Spread out towels and use fans and dehumidifiers to help dry the area as much as possible. This process can take a while depending on how wet the area is, but it’s important to get it as dry as possible before proceeding with any repair or restoration work.

If the water damage has caused any drywall or insulation to become wet, it’s important to remove it and replace it as soon as possible. This will help prevent mold growth and ensure that the affected area is safe for use.

Water-damaged drywall is one of the most common and difficult to repair. A professional restoration company can help dry out the affected area and even install new drywall if needed. They can also repair any molding, flooring, or appliances that have been affected by the water damage.

Dry Out The Area

If your ceiling has water damage, it’s important to dry out the area as soon as possible. This will help prevent the growth of mold and other problems. It will also protect the rest of your home from damage.

Drying out the area can be done in several ways. You can use fans to circulate the air and dehumidifiers to remove moisture. You can also use a wet vac to remove any standing water and other debris. You can even open windows and doors to speed up the drying process.

Once the area is dry, you can start to repair the damage. This may involve putting in a new section of insulation or replacing drywall. It might also mean painting or staining the ceiling. It’s important to remember that if you’re dealing with water damaged ceiling it will need to be repaired by professionals. This will ensure that the problem is fixed correctly and that it won’t happen again.

It’s important to make sure that you have all the proper equipment for repairing a water-damaged ceiling. This will include a utility knife, gloves, and a face mask. You’ll also want to make sure that you have a bucket or tarp to catch any water that might drip or spill while you work.

You’ll also want to check for any structural damage on the ceiling. Water can cause wood to swell and crack, which could lead to a collapsed ceiling. You should also look for any areas that have a lot of discoloration or stains. This could indicate that there is a serious problem with your roof or plumbing.

Once the problem is identified, you can call a plumber to fix it. If the problem is caused by your roof, you’ll need to call a roofing company. It’s also a good idea to call a plumber who specializes in water damage restoration. They’ll be able to identify the source of the leak and stop it before it causes more damage. They’ll also be able to repair any damage that has already been done.

Repair The Damage

Once you have stopped the leak and gotten rid of any excess water, it is time to start repairing the damage. First, you need to disinfect the area. This is done to make sure there are no mold spores present before you begin working on the ceiling repair. There are many products available at your local home improvement store that can be used for this purpose. Once this is done, you can begin removing the drywall and insulation that are damaged. It is important to be careful when doing this as the drywall may be weakened and could collapse. This is why it is important to wear gloves, eye protection, and a mask when doing this. It is also recommended to use a dehumidifier in the affected room to help remove any remaining moisture.

If the drywall isn’t destroyed, it can be patched with a drywall patch kit. However, it is important to make sure the drywall is completely dry before doing this. This can be difficult because drywall holds on to water very well, so it may take a long time to dry out. To speed up the process, you can use fans in the room to circulate air and help get it dry.

Next, you need to check for other areas of damage. Look underneath the drywall for signs of mold or mildew. It is also a good idea to feel the wood of the structure to see if it has been weakened by water. If you see any sagging or serious water damage, it is probably a good idea to call a professional for the repair.

If you are experiencing water damage on your ceiling, it is important to take action immediately. This is not something that should be left to chance, as water damage can lead to a wide range of issues in your home. To prevent water damage in the future, you should perform routine maintenance on your HVAC system and appliances to avoid clogs, clean your gutters regularly, and hire a plumber for any needed plumbing repairs.

Kitchen Remodelers

Your kitchen is the heart of your home. It’s also a primary selling point for buyers.

Kitchen Remodeling In Richmond VA can help you achieve the look and functionality you want while adding value to your property. They can also save you time and money. They do the work, so you can focus on your day-to-day routine.

Kitchen remodelers offer build and design services to transform an outdated or poorly-functioning kitchen into a beautiful, modern space. While many homeowners choose to do this work themselves, it’s often best left to kitchen remodeling specialists who have the experience and expertise to get the job done right.

The first step in any kitchen renovation is the demolition phase. Depending on the scope of the work, this may include removing cabinetry, flooring, and appliances or simply tearing down walls to open up a room. A reputable contractor will have the proper equipment to safely handle this task, including a dumpster or trailer for hauling away all the old stuff.

In addition to preparing the space for new construction, kitchen demolition also provides the opportunity to uncover any hidden issues such as leaking plumbing or rotted floor beams that should be addressed before proceeding with the renovation. This can save time, money, and headaches down the road.

Homeowners often think of conducting their own kitchen demolition as a way to save on costs. However, DIYers should beware: attempting this work without the proper tools or expertise can result in unnecessary damage and add months to the timeline of the project. Fortunately, there are kitchen remodelers who specialize in doing the demo and can help you achieve the results you desire while staying within your budget.

A complete kitchen gut renovation requires a more extensive demo process than a basic makeover, including removing wall and ceiling drywall to expose the structural framing and wiring for changes to partition walls, adding an addition, or changing the interior layout. This stage of the project also involves moving gas lines, rerouting plumbing lines, and rewiring electrical in order to create the desired space.

The design phase is where the kitchen remodeler and homeowner work together to envision the ideal layout and aesthetic for the new space. Then, materials, from cabinets to appliances to fixtures and more, are selected to align with the kitchen remodelers’ clients’ goals and budgets.

Some kitchen designers use high-tech tools like virtual reality and 3-D animation to create a virtual simulation of the finished project. But even a basic drawing on paper is a useful tool for communicating ideas.

Many home center and kitchen specialist/design stores offer free kitchen design services. Standalone providers of a single kitchen product, such as cabinets, also often provide free design assistance. These kitchen-design services can be a great way to get your renovation project off the ground.

A mid-size kitchen remodel is likely to involve cabinet removal and drywall patching, as well as some changes to plumbing and electrical elements. Remodelers will usually remove the existing countertop and sink/faucet and install a new one, as well as add or replace flooring. The remodeling contractor may also frame in a new window or other structural change, and he or she will likely add insulation to help reduce energy costs.

A full kitchen renovation is usually the most costly type of kitchen design project. Upscale remodels generally involve reconfiguring the entire footprint of the room, re-routing pipes and gas lines, and possibly relocating the dishwasher, oven, or refrigerator. They typically feature top-of-the-line appliances, luxe or specialty materials and significant customization of sizes and shapes. These projects are often complex and require the involvement of an architect and sometimes engineers, as well as building permits.

A kitchen remodel can bring new life to a room, improve functionality and add value to your home. While some homeowners might attempt a DIY project, this type of renovation requires expert plumbing services to ensure everything goes smoothly. This is especially true if you want to install a brand-new sink, faucets or appliances that require complicated pipework and hookups.

A master plumber who specializes in kitchen remodeling can help ensure that your new fixtures and appliances are properly installed, which will reduce the risk of leaks and other problems down the road. They can also guide you through the design process and offer advice on how to save money on materials, fixtures and finishes.

While choosing a contractor, ask to see their license and proof of insurance. If they aren’t insured, you could be held liable for any accidents that occur during the project. Also, look for active memberships in professional associations as this demonstrates their commitment to the industry.

In addition to ensuring all new work meets code requirements, the right plumber will inspect existing plumbing before any remodel starts. Hidden water damage, mold or other issues may be revealed when walls and flooring are removed, and the plumber can take care of these before they become worse.

During a remodel, the plumbing contractor can install new sinks and faucets, including entertainment or bar sinks, as well as dishwashers. They can also run new gas lines for stoves, ice makers and refrigerators. They can even install radiant floor heating, which is more efficient than traditional forced air systems. Most mid-size and major kitchen remodels require a permit, so the plumber will have to submit all plans for approval and inspection.

A kitchen remodel is a major project that can include replacing cabinets, flooring and countertops, adding a kitchen island, new appliances or even expanding the size of the kitchen. Often, it can require the demolition of existing walls and ceiling to create an open floor plan. Depending on the scope of the remodel, this can also include moving and replacing electrical wiring. This is where an electrician can be very helpful.

Many homeowners neglect to consider the electrical requirements of a kitchen remodel, especially in older homes. This can lead to problems down the road that could have been avoided by working with a professional electrician at the time of remodeling. New outlets and switches are sometimes necessary for modern appliances, and certain types of outlets (such as GFCI) must be used in kitchens to protect against electric shock.

The layout of electrical outlets and lighting circuits is crucial to the overall functionality and enjoyment of a newly remodeled kitchen. A well thought out plan can increase convenience and add value to your home. Whether it’s replacing harsh florescent lights with more energy efficient fixtures, or adding recessed lighting to illuminate your work area, the right layout can make all the difference.

It’s easy to overlook the electrical aspects of a remodel, but they’re just as important as the new granite countertop or brushed nickel sink. Working with a professional electrician can help make the process much less stressful, and you’ll have peace of mind knowing that your new kitchen is up to code. Our electricians have worked with numerous different kitchen remodelers and are familiar with the requirements for each job. We can help you get your remodel completed on schedule and within budget.

Many remodelers offer finishing services, including installing cabinets and countertops and installing appliances. They may also paint or stain the new surfaces. This helps to protect the finish and improve the look of the kitchen. Often, this stage is the most time-consuming, as it involves multiple steps and can require the services of professional carpenters and installers.

A kitchen renovation essentially shuts down the heart of your home, so homeowners should be prepared to go through a period without home-cooked meals and budget for plenty of pizza and take-out food. This may extend for several weeks or even months depending on the scope of the remodel.

Homeowners should choose contractors that have experience working with the type of materials and design they want. They should also be able to provide references from previous clients. A homeowner should meet with a contractor in person before making a final decision. This is the best way to ensure they understand the project and can ask any questions.

A major remodel can involve significant changes to the floor plan, which typically requires tearing down walls and relocating plumbing. This may mean borrowing space from other rooms or adding an addition. It can be a complex job that can take up to six or more months to complete. It may be necessary for a homeowner to move out of the house during this phase.

Home Improvement Ideas That Work

house painting ideas

Home improvement projects can add value to your property and transform rooms into spaces that work better. These projects don’t have to be complicated or expensive. To visually enlarge a room, try painting ceilings the same shade as walls. A creamy yellow like Sherwin-Williams’ June Day reflects natural light and makes rooms feel cozy and inviting.

A fresh coat of paint can make a huge difference in the look and feel of a home. It can also help to hide flaws in the walls and ceilings. When choosing an interior color, choosing one that will coordinate with the trim and baseboards is a good idea. This will create a cohesive look and make it easier to do touch-ups in the future. Get help from expert Painter Fort Lauderdale.

Before you start painting, it’s important to take the time to prepare the room for painting. This includes cleaning, applying painters tape where necessary, covering doorknobs and floors with plastic sheets and removing outlet plates and switch covers (and collecting the screws in a zip-top bag for later). The more effort you put into this prep work, the less chance of accidental paint splatters on things you don’t want to get messy.

It’s also a good idea to choose a time of year when the weather won’t be too hot or too cold. This will make the project more comfortable and will ensure that the paint dries properly. If you can, buy your gallons of paint at this time as well. This will allow you to avoid long lines at your local paint supply or hardware store and will save money since traffic triples on the weekends.

If you’re painting a house with old or peeling walls, it’s best to hire professional painters. It can be difficult to achieve the desired look with a DIY approach. A professional will be able to advise you on the right tools and techniques for the job. In addition, they can use high-quality paints that will last longer and will look better than cheaper paints.

Upgrading the Floors

The floors of a house get the most wear and tear, so they are usually the first thing to show signs of age. Whether it is the carpet in the bedroom, the kitchen linoleum, or the hardwood hallway, upgrading the floors can make the entire house feel fresh and new again. The good news is that, unlike many home improvement projects, this one can often pay for itself when it comes time to sell the house.

A professional interior painting contractor can come up with creative room painting ideas for your house. They can also help you select the best color and design for the house. This will make the house look appealing and unique to the buyers. Moreover, these contractors can give you an idea of the total expenditure on the project as well.

Window Treatments

When you’re decorating a house, it can be easy to forget that the window treatments are an important part of the design as well. However, the right window treatment ideas can bring a whole new level of style to a room.

You can add some extra curb appeal to your home by painting the trim or sashes of your windows. This will give your home a crisp, finished look that also helps the interior colors stand out. While many homeowners choose to paint sashes and trim white, you can go with a different color to make your home more unique and fit your personality.

Whether or not you’re planning to sell your home later on, it’s always wise to choose neutral paint colors for the exterior. These shades won’t offend your neighbors and will make it easier to repaint the exterior if you decide to sell the home. Some homeowners opt for darker neutrals like charcoal or black to provide a bolder appearance, but this choice may require more elbow grease to maintain.

The type of windows you have in your home will affect the types of window treatments you’ll want to use. For example, if your windows look out over a stunning landscape, you’ll probably want to frame that view with window treatments that highlight the scenery. On the other hand, if your windows are at street level and anyone can see into your home, you’ll likely want more privacy-oriented window treatments.

If you’re unsure which window treatments will complement your new home, you can start by choosing a neutral wall color that works with any type of fabric. Then, select a complementary shade for the trim around your windows or sashes. Finally, you can add some decorative flair with a valance or other window adornments that help conceal the sash and trim while adding height to your windows.

What You Should Know About Window Replacement

Many homeowners choose Windows North Attleboro MA replacement to increase their home’s energy efficiency. Older windows allow ice, water, and air to enter the home, causing rotting, mildew, and high energy bills. There are two methods of replacing existing windows: insert and full-frame. Insert windows are installed within the existing frame, while full-frame replacements remove and replace the interior and exterior trim.

window replacement

Paint can chip or peel when it loses its adhesion with the underlying surface. Moisture typically triggers this, whether it’s condensation on the interior or rain and snow on the exterior. Paint chips and peels aren’t just unsightly; they can actually be hazardous to people walking by. If the paint is flaking, it may have exposed bare surfaces that could be abrasive or scratchy and can also contain lead. To be safe, always test for the presence of lead before scraping or sanding. If the paint is old enough, you should also follow EPA guidelines for working with chemical strippers or heat guns to ensure your safety.

Unless you’re looking for a shabby chic look, it’s important to repair peeling or chipped paint right away. If left unchecked, this can cause further damage to your home. It can also make the window sill or frame rot and lead to water leaks.

Removing peeling or chipped paint can be a DIY project, but it’s often better to leave it to the professionals, especially if you suspect the problem is caused by a larger issue like moisture. A professional can strip the surface and sand it down to prepare it for new paint, while also making sure any rotting wood is repaired.

Caulking is a sealant used to fill in gaps. It’s commonly found around bathtubs and crown molding, as well as between your window frame and wall. If the caulking begins to wear down, this can let in water and allow mold and mildew to grow. This can be a common source of draftiness and should be re-caulked on a regular basis, usually at the end of summer or before cold weather arrives.

Window casing is the outer layer of wood that protects your window panes. It can be real or faux, but either way it’s a part of your window that contributes to the overall appearance and curb appeal of your home. Casing can be damaged by moisture, causing it to crack, rot, or even fall off. Replacing or repairing it is a relatively simple carpentry project and can be done without replacing your windows.

Water Damage

If your windows aren’t sealed properly, water can seep into the frame and cause serious damage to the rest of your home. Moisture can wreak havoc on walls, floors, and other construction materials in the house, leaving behind unsightly water spots or even collapsing wall structures over time. Luckily, water damage from window leaks can often be easily repaired. Inspect the walls around your windows to check for signs of moisture damage, like discoloration or paint bubbles/peeling.

Wooden window frames are especially susceptible to water damage, and a telltale sign is when the wood starts to rot. The rotting process is accelerated by moisture, leading to a dark brown or black color and soft or spongy feel. If you see this, it’s probably time to re-seal your windows or, in severe cases, replace them.

In addition to a cracked frame, you might also notice that your windows aren’t shutting easily or properly. This can be caused by a number of things, including the weather, old caulking, or improper flashing. If the weather is cold, it’s especially important to check that your windows are properly insulated.

A poorly insulated window will lead to energy loss and may also be a cause of leaks. A professional window replacement company can assess your insulation and make any necessary repairs.

Lastly, it’s important to inspect the muntins or mullions of your windows for any chips or flaking. These small pieces of wood are decorative or functional, and they sit in between panes to create a cross-like pattern. If they’re chipped or peeling, it’s likely that they need to be replaced, and this can easily be done during a window replacement.

It’s also important to check for any other signs of moisture damage, like gaps developing between floorboards or warped drywall. Moisture can cause serious structural issues in your home if it’s allowed to spread too far, and it’s best to catch any problems early with regular inspections and maintenance. If you’re seeing any of the above signs, contact Denver window services for an immediate repair or replacement.

Cracked or Broken Glass

Cracked or broken glass is a very serious window problem that should be addressed immediately. It allows draughts to enter the property, which is not good for your energy bills, and it also compromises the integrity of the window, meaning that it may not be as effective at keeping heat inside in winter and outside in summer. It can also be a security risk as it allows intruders or wild animals into the home and can be hazardous to anyone who touches it as tiny slivers of glass can become embedded in your skin.

There are two different routes you can take for a cracked window fix: a temporary one that takes care of the immediate problem, or a long-term repair option that will result in better results. The former involves using a heavy-hold tape that will keep the crack from worsening until you can get the problem repaired professionally. One strip of masking tape on each side should be sufficient for superficial cracks such as stress cracks that occur when the temperature changes dramatically. Deeper cracks will require a sturdier solution such as epoxy that can be mixed and applied with a putty knife.

You will need to clean the crack thoroughly first before applying the spackle to ensure that you have a smooth surface and that it is free of dirt or dust. Then apply the spackle over the crack, ensuring that it is fully covered and then leave it to dry. Use sandpaper to smooth the spackle once it has dried to make sure that it is level with the rest of the window.

Another way to cover up a crack is to use epoxy resin, which can be bought at most hardware stores and is relatively easy to apply with a putty knife. It will also require a thorough cleaning of the crack to remove any dirt or debris, and you should let it dry completely before using sandpaper to smooth it down and then again to ensure that it is level with the rest of the glass. This option will provide a more durable repair and will result in the crack looking as though it never existed.

Leaky Seals

Window seals are a crucial part of your home’s insulating system. They keep outside air and argon gas from seeping through between glass panes, which helps your energy bills stay low and protects your furniture and other belongings from the elements. Unfortunately, like any other exterior component, window seals will eventually wear out and need repair or replacement.

The most obvious sign of failing window seals is moisture between the panes, which shows up as fog. This moisture isn’t just unsightly; it can lead to mold, wood rot, metal rust and other forms of damage to the window frame and surrounding walls.

Failing seals also let outside air leak into your home, which can create drafts or disrupt your home’s temperature balance. This will make your HVAC system work harder to maintain the proper temperature, which can lead to higher energy bills. In addition, failing window seals can reduce your home’s noise-blocking capabilities.

Ultimately, replacing the window and sealing it properly is the best way to fix a broken seal. However, this isn’t an easy do-it-yourself (DIY) project; a single mistake could result in further damage and leave your window unprotected. If you’re concerned about the condition of your window seals, it’s worth contacting a Wixom windows replacement company for professional help.

Window manufacturers usually provide care instructions for their products, which is something homeowners should read. These guidelines can be a good starting point for understanding how to extend the lifespan of your window seals and keep them functioning optimally.

In many cases, a broken window seal can be repaired by adding caulking or weather stripping around the edges of the frame. However, if the problem is more serious, the only solution may be to replace your window or insulated glass unit (IGU) entirely. Typically, only professionals can perform this type of window repair, as it requires removing the IGU from the frame and dismantling the window assembly. This can be difficult and time-consuming, especially if your window has been in place for years. However, this is the only way to restore your home’s efficiency and protection to an acceptable level.